
Caketisserie is back! Apples, Aniseed & Peanuts Fresh Cream Cake!
- Isabelle Boizis

- Sep 22, 2022
- 4 min read

I think it's safe to say judging by the rainy sky outside, that Fall is upon us...
And as much as I looooove Summer just like the next person, there is something about Autumnal recipes that I find comforting. Maybe it is the fact that most sweet recipes in Autumn start including warm spices such as cinnamon, aniseed, nutmeg,... All my favourite ones basically!
This cake was created with just that in mind! Something not too heavy, but with that warm-y and comforting feeling, to be enjoyed with a warm cup of tea after a long walk in the woods on a lovely fall afternoon (sign me up!).
The sponge is made with peanuts, the addition of nuts in any sponge helps keeping it nice and soft whilst bringing some interesting flavour! The apples are nicely and slowly caramelised in a pan, infused with aniseed and lastly, all brought together with a light Vanilla Creme Chantilly.
Here is the recipe:
Sponge
For a 5" cake (line a single 5" cake tin)
Eggs 75g (or 1.5 medium egg)
Yoghurt 180g
Light brown sugar 170g
Melted butter 75g
Self Raising Flour 250g
Ground Peanuts 25g
In your kitchen mixer bowl, add: eggs, yoghurt, sugar, ground peanuts and melted butter. Mix on medium speed with the Paddle attachment until homogenised. Sieve the flour and add to the rest, mix gently until well incorporated. Make sure to scrape the bottom of the bowl well and mix one last time.
Pour in the cake tin and bake for about 45 min at 165ºC (check after 30-35 minutes and keep baking until golden brown on top + a knife or testing prop comes out clean after poking the cake all the way).
Caramelised Apples

Two apples (Pink Lady type)
Golden Caster Sugar (or normal Caster Sugar) 75g
Butter 20g
Star aniseed x 3
Cut your apples in segments as shown on photo - ideally each half in 6/7 segments so that they stay relatively thin.
Pour the sugar in a pan on medium heat and let caramelise gently then add the butter and stir well to incorporate it.
Add the apples to the pan and on low heat, gently stir, along with the aniseed, until soft and well coated in caramel.


Remove from the pan and leave them to cool down.
Aniseed Syrup
Sugar 100g
Water 120g
Star Aniseed x 2
Bring all the ingredients to a boil and leave aside.

Chantilly Cream
Whipping or Light Double Cream (must be at least 30% fat content to be whipped) 200g + an extra 40g of fresh whipping cream to be saved for the end.
Mascarpone 40g
Golden Caster Sugar (also works with any type of sugar - even icing) 25g
1 tsp of Vanilla Bean Paste
Nutmeg (optional) 1/4 tsp
Place all the ingredients together in your mixing bowl and with the whisk attachment, start whipping on medium speed. It's best to whip on medium speed for better air bubbles structure (plus it gives your more time to check the consistency).
First, whip to only 70% of the consistency - it needs to be right under soft peaks. Pour half of that cream in a clean bowl and save in the fridge - you will use this to cover the cake later.
Resume whipping to reach a thicker consistency, ideal for filling the cake - It needs to be soft enough to be spread easily and still hold its shape.
Assembling the cake

Cut the sponge in three layers.
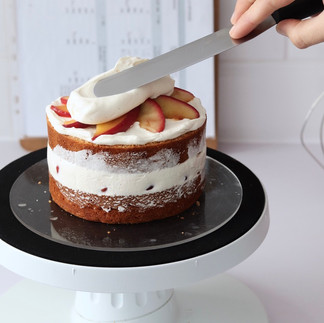
Place the bottom layer on a cake board and drizzle some syrup on top (I love using warm syrup - it goes through better!). Place a dollop of cream and spread it gently then place the apples in a circle as shown on photo below.


Add another dollop of cream on top of the apples and spread to cover them completely.
Add the next layer of sponge, and repeat the same process again.


Finish by covering with the last layer of sponge and place in the fridge for at least an hour


Use the Chantilly Cream previously saved in the fridge to cover the cake. Whip it again of needed for a thicker consistency BUT be careful, you want to work with a runnier consistency than the one you used to fill the cake - start with soft peaks - as the cream will thicken as you work it.

For this cake, I thought I'd cover it in pink. And then had a change of heart! It's ok, it happens, I simply dod a first layer of coating in light pink, and the finished with plain white cream. And as it turns out, it gave a little pink hue to the cake, AND when cut, you could see the thin pink layer underneath that matched perfectly the apples on the inside! Funny how sometimes mistakes turn well, that's why it's so important to make them :)


For the final touches, I simply piped some kisses all around the cake, cut some really thin apple slices, and touched up with some gold leaf. No fuss, simple and pretty!


Truly hope you enjoy this recipe, and most importantly, that you give it a go!!! Remember to use the #caketisserie #zazamarcelle hashtags and tag me in your creations so that I can share your work with the world!!!
Happy baking my friends!
Zaza x


Comments